
现在项目使用了Spring Cloud Config配置中心,下面简单将学习到的记录一下。
为什么要用Spring Cloud Config?
- 由于在分布式系统中,服务数量巨多,可以方便服务配置文件统一管理
- 可以实时更新配置
- 可以与Spring项目无缝集成
简介
SpringCloudConfig就是我们通常意义上的配置中心,把应用原本放在本地文件的配置抽取出来放在中心服务器,从而能够提供更好的管理、发布能力。SpringCloudConfig分服务端和客户端,服务端负责将git中存储的配置文件发布成REST接口,客户端可以从服务端REST接口获取配置。
架构

在Spring Cloud Config中有三个角色:
- 配置仓库,专门存放配置文件的git项目
- Spring Cloud Config Server 配置中心服务端,用于从git项目拉取配置文件。
- Spring Cloud Config Client 客户端,也就是具体是Service。就是将Client的配置放在远程的git项目中,统一管理和更新。
这个架构十分简单明了,下面就是个demo。
Quick Start
一、配置文件项目
- 在远程git仓库新建一个存放配置文件的git项目
config-repo - 添加项目配置文件,如
application.propertiesapplication-dev.properties,application-test.properties等。
{application}-{profile}.properties
或
{application}-{profile}.yaml
其中:
{application}映射到Config客户端的spring.application.name属性
{profile}映射到Config客户端的spring.profiles.active属性,可以⽤来区分环境,
⽐如dev,test,produce等等
二、Spring Cloud Config Server
新建spring boot项目
spring-cloud-config-server添加依赖
1
2
3
4<dependency>
<groupId>org.springframework.cloud</groupId>
<artifactId>spring-cloud-config-server</artifactId>
</dependency>在程序的启动类
Application上添加注解@EnableConfigServer开启SpringCloudConfig服务端1
2
3
4
5
6
7
8
9
10
11
12
13
14package io.ymq.example.config.server;
import org.springframework.boot.SpringApplication;
import org.springframework.boot.autoconfigure.SpringBootApplication;
import org.springframework.cloud.config.server.EnableConfigServer;
public class ConfigServerApplication {
public static void main(String[] args) {
SpringApplication.run(ConfigServerApplication.class, args);
}
}添加配置
在配置文件
application.properties中添加1
2
3
4
5spring.application.name=config-server
server.port=8888
spring.cloud.config.label=master
spring.cloud.config.server.git.uri=ssh://XXXXXXX:22222/edu/config-repo.git
spring.cloud.config.server.git.search-paths=spring-cloud-configspring.cloud.config.server.git.uri:配置git仓库地址
spring.cloud.config.label:配置仓库的分支
spring.cloud.config.server.git.searchPaths:配置仓库存储路径,一个应用一个目录。这样就可以在一个仓库中管理多个服务的配置
spring.cloud.config.server.git.username:访问git仓库的用户名 如果是公开项目,则不需要
spring.cloud.config.server.git.password:访问git仓库的用户密码 如果是公开项目,则不需要
spring.cloud.config.server.git.basedir:指定缓存文件夹
spring.cloud.config.server.git.cloneOnStart: 服务端可以配置为在启动时克隆存储库
可以通过接口访问配置文件
http请求地址和资源文件映射如下:
/{application}/{profile}[/{label}]/{application}-{profile}.yml/{label}/{application}-{profile}.yml/{application}-{profile}.properties/{label}/{application}-{profile}.properties
三、Spring Cloud Config Client
新建spring项目
spring-cloud-config-client,就是正常的spring项目添加依赖
1
2
3
4<dependency>
<groupId>org.springframework.cloud</groupId>
<artifactId>spring-cloud-config-client</artifactId>
</dependency>配置文件
bootstrap.properties1
2
3spring.cloud.config.label=master
spring.cloud.config.profile=dev
spring.cloud.config.uri=XXXXXXspring.cloud.config.label 指明远程仓库的分支
spring.cloud.config.profile 根据环境获取文件
spring.cloud.config.uri 指明配置服务中心的网址。
spring.cloud.config.failFast 在没有连接配置服务端时直接启动失败
用
bootstrap.properties而不是application.properties是因为bootstrap加载比application.properties要早。
至此,配置就完成了,可以启动client测试一下,看client是否能够获取到配置在远程仓库的属性。
存在问题
如果像上面那样配置,服务端负责将git中存储的配置文件发布成REST接口,客户端可以从服务端REST接口获取配置。但客户端并不能主动感知到配置的变化,从而主动去获取新的配置,这需要每个客户端通过POST方法触发各自的/refresh。如果所有客户端的配置的更改,都需要手动触发客户端 /refresh ,当服务越来越多的时候,那岂不是维护成本很高,显然不太合适
我们需要客户端能够感知配置仓库更新,自动拉取最新配置。我们可以使用Spring Cloud Bus 消息总线实现方案,可以优雅的解决以上问题,那就是通过消息代理中间件RabbitMQ ,和 Git的Webhooks來触发配置的更新。
实现自动刷新配置
Spring Cloud Bus
Spring Cloud Bus 将分布式系统的节点通过轻量级消息代理连接起来。用于在集群中传播状态更改(例如配置更改事件)或其他管理指令。Spring Cloud Bus 的一个核心思想是通过分布式的启动器对 Spring Boot 应用进行扩展,也可以用来建立一个或多个应用之间的通信频道。目前唯一实现的方式是用 AMQP 消息代理作为通道,但是相同的基本功能集(还有一些取决于传输)在其他传输的路线图上。
消息总线
消息总线是一种通信工具,可以在机器之间互相传输消息、文件等。消息总线扮演着一种消息路由的角色,拥有一套完备的路由机制来决定消息传输方向。发送段只需要向消息总线发出消息而不用管消息被如何转发。 Spring cloud bus 通过轻量消息代理连接各个分布的节点。管理和传播所有分布式项目中的消息,本质是利用了MQ的广播机制在分布式的系统中传播消息,目前常用的有Kafka和RabbitMQ 。 下面是配置中心刷新配置的例子:
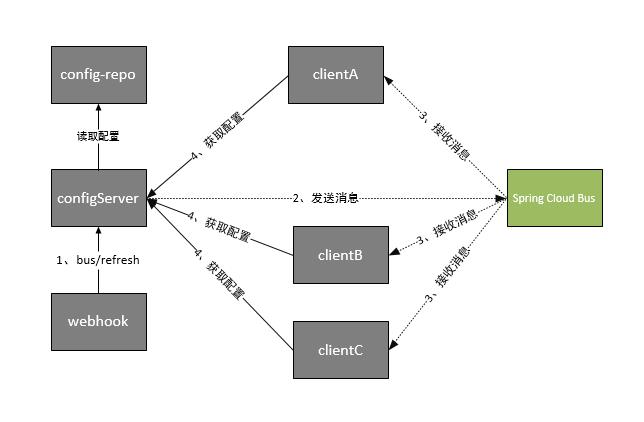
因为我们引入了消息总线,所以Server和Client都连接到了RabbitMQ队列当中。
- 当Server接收到refresh请求的时候,并发送给Spring Cloud Bus。
- 通过Spring Cloud Bus给发送Client客户端发送更新消息
- Client接收到通知,请求Server端获取最新配置
那么如何在更新配置仓库的时候自动触发refresh呢? 我们可以使用远程仓库的webhook钩子来实现。
webhook会在我们向仓库发送push请求的时候,对指定的url发送一个POST请求。当我们向配置中心的配置仓库发送push请求,他就会向我们的配置中心的/bus/refresh发送一个POST请求,那么就达到了服务刷新的目的了。
Quick Start 2
跟着上面的Quick Start只需要做很少的修改就能支持。
Spring Cloud Config Server改造
添加pom依赖
1
2
3
4<dependency>
<groupId>org.springframework.cloud</groupId>
<artifactId>spring-cloud-starter-bus-amqp</artifactId>
</dependency>引入
spring-cloud-starter-bus-amqp包,增加对消息总线的支持配置文件添加
1
2
3
4spring.rabbitmq.host=192.168.252.126
spring.rabbitmq.port=5672
spring.rabbitmq.username=XXXXXX
spring.rabbitmq.password=XXXXXX配置文件增加RebbitMq的相关配置
Spring Cloud Config Client改造
和Server一样,添加pom依赖和配置文件。
在使用@value注解的类上,加上@RefreshScope注解,来使能够更新属性值。
git配置仓库添加webhook
只需要在仓库git->settings->Webhooks。
payload url中填上配置中心的/bus/refresh就可以达到目的了。
以上项目就改造完成了。
其他
局部刷新
某些场景下(例如灰度发布),我们可能只想刷新部分微服务的配置,此时可通过/bus/refresh端点的destination参数来定位要刷新的应用程序。
例如:/bus/refresh?destination=customers:8000,这样消息总线上的微服务实例就会根据destination参数的值来判断是否需要要刷新。其中,customers:8000指的是各个微服务的ApplicationContext ID。
destination参数也可以用来定位特定的微服务。例如:/bus/refresh?destination=customers:**,这样就可以触发customers微服务所有实例的配置刷新。
跟踪总线事件
一些场景下,我们可能希望知道Spring Cloud Bus事件传播的细节。此时,我们可以跟踪总线事件(RemoteApplicationEvent的子类都是总线事件)。
跟踪总线事件非常简单,只需设置spring.cloud.bus.trace.enabled=true,这样在/bus/refresh端点被请求后,访问/trace端点就可获得类似如下的结果:
1 | [ |
